Cupcake Soap
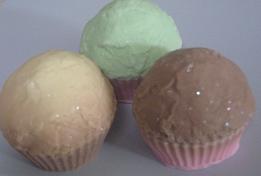
Gorgeous colored cupcake soap will look great in your bathroom and your friends will be really impressed. It's always great to be able to say "I made them myself".
I will show you how to make cup cake soaps in a few easy steps.
You can either use paper cases in your cupcake trays or cupcake shaped moulds which are readily available.
Things you'll need
 Soap Base
Microwavable container
Cutting board
Measuring spoons
Fragrance or essential oil (optional)
Soap-safe dye (optional)
Large knife
Mould
Instructions
1. Prepare your workspace. You need a clean stretch of countertop or table, as well as all of your necessary tools.2. Cut the base into chunks and place it into a container. Weigh it until you think you've got the amount that your mould can hold - a few tenths of an ounce over or under won't matter.
3. Make sure that your knife, cutting board, and container are free of dirt - soap picks it up easily, and its difficult to get off.
4. Melt the base. Pour the chunks in a microwave-safe bowl and cover with plastic wrap. Heat for just one minute, and take out and stir. It will be thick and chunky. Repeat heating for a minute at a time, stirring afterward, until it is smooth and chunk-free. Warning: The soap base will be very hot when fully melted.
5. Add the fragrance or essential oil. (It is best to wait until the soap has cooled a bit before adding fragrance, this will ensure that your finished soap has a strong smell, or you use less fragrance - using a thermometer cool the soap to between 55 and 60 degrees C) A good amount is probably .25 ounces (about 7 grams). This step is optional - sometimes fragrance can irritate sensitive skin.
6. Add color. This step is optional - some people prefer to have colored cupcake soap. Do not use food or candle specific coloring which might stain your skin. Use a soap safe dye, which can be purchased from your craft store. Remember that soap-safe dye is much weaker than candle dye, and you will need to put in more than you would in the same amount of candle wax.
7. Stir the melted soap - but don't stir too hard, otherwise bubbles will form in the soap.
8. Pour the soap into the mould. Pour slowly as to not get bubbles in the soap. If you are using a cupcake mould and going to do different colours for base and cake, you start with the cake colour and pour to the start of the cupcake liner (remembering that the mould is upside down). If using paper cases, fill to the top. Once you do this, you can either cover with plastic wrap and leave it on the counter or place it into the refrigerator.
9. Once soap has cooled add the base colour if using a mould. If using paper cases, allow the second colour to cool and firm slightly as you can then mould it to the shape you desire. It will take approximately one hour in the refrigerator or several hours on the counter to cool. Cooling in the refrigerator will reduce your finished soap fragrance Do not place in the freezer.
10. Release cupcake soap from the mould. After it is hard, pop the soap out of the mould. Sometimes it will not come easily - try tapping the back with your hand or a large spoon if the soap is exceptionally stubborn.
Experiment with different amounts of fragrance and color for different results.
If you have sensitive skin, do not put fragrance or color in the soap. It will not irritate normal skin, but it may irritate sensitive skin.
If bubbles form in the soap while pouring it into the mold, lightly spray the tops with rubbing alcohol.
Rub your mould with a little bit of Vaseline so the soap is easier to get out when it is hard.
Remember that your cupcake soap is only as good as your soap base - buy a good quality soap base at your craft store.
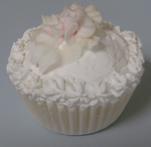 I was given this decorated cup cake soap as a present from my husband. It is so gorgeous that I don't want to use it! This soap has intricate piping around the edge and stunning piped flowers on top.
There are several on-line and off-line businesses that sell cupcake soaps. Here are some of my favorites
If you want to try making your own soap, here are some cupcake molds which are suitable for making soap, candle and bath bombs.
Return to All About Cupcakes home


 For the BEST cupcakes, this works like crazy ... Click here to get your copy of Patty cake, patty cake... |
 The Fastest Way to turn your Cupcakes into Cash |
| Get Your Cupcake Questions Answered! Your FREE cupcake newsletter full of recipes and cupcake news. Click here to get your copy of Cupcake Corner. |
Most Popular Pages
Follow Us


Popular Products